![[Photo of the Author]](../../common/images/Guido-S.gif)
by Guido Socher (homepage)
About the author:
Guido loves Linux not only because it is fun to discover the
great possibilities of this systems but also because of the people
involved in its design.
Content:
|
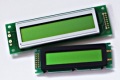
Frequency counter 1Hz-100Mhz with LCD display and RS232 interface
![[Illustration]](../../common/images/article253/linuxfcount_topview_small.gif)
Abstract:
This article continues the AT90S4433 Microcontroller series.
I suggest you to read the previous articles on Atmel Microcontroller
programming with regards to:
- How to install and use the Linux AVR development environment and
how to build the programmer hardware:
March 2002, Programming
the AVR Microcontroller with GCC - How to make your own printed circuit board:
May 2002, A LCD control panel for your
Linux server
This time we design a frequency counter which can measure frequencies from
1Hz to 100MHz. Alternatively you can use it also to
just count events, such as how many people crossed the street (what ever
is available as a digital pulse).
The counter has a LCD display as well as a RS232 interface to read out the counter
results
from Linux.
_________________ _________________ _________________
|
Introduction
The frequency of a sine wave or square wave signal is expressed as the number of
oscillations per second. In order to determine the frequency of
a continuous signal one just needs to count those oscillations.
This way we determine the frequency of the first harmonic of a continuously
oscillating signal. To measure the frequencies that a non continuous
"sound" is composed of, you need a spectrum analyser. This is however a different
piece of hardware. What we design here is a frequency counter for
continuously oscillating signal. We assume that the signal does not change
its frequency during a given interval where we sample the signal.
Our frequency counter works in 2 steps:
- Take off any DC offset from the signal and then convert it into
a square wave by using a voltage comparator.
- Count the number of pulses per time and divide by the time
interval.
What you need
To build the frequency counter you need the following parts:
1 x Atmel At90S4433 Microcontroller
1 x 28pin 7,25 mm IC socket
2 x 16pin IC socket
1 x 1pin IC socket
1 x 14pin IC socket
No IC sockets for the MAX903 and the 74F74. Solder them directly to the
board!
1 x MAX232
1 x 4,194304MHz crystal
1 x LEDs (green)
1 x BC557 PNP transistor
4 x 1uF capacitor (biased)
2 x 27pF ceramic capacitor
4 x 10nF mini ceramic capacitor
3 x 100nF mini ceramic capacitor
1 x 200nF mini ceramic capacitor
1 x 0,47uF mini ceramic capacitor
2 x resistor 470 Ohm
1 x resistor 470K
2 x resistor 100 Ohm
3 x resistor 1k
5 x resistor 10k
3 x resistor 47K
1 x resistor 220 Ohm
3 x resistor 4K7
1 x resistor 3k3
1 x resistor 2k2
1 x resistor 47 Ohm
1 x 4K7 potentiometer (as small as possible), if you want you can
replace this potentiometer by a pair of resistors. This potentiometer is
used to set the
LCD contrast. For my LCD displays 100Ohm together with 1K gives a
good contrast.
1 x Z-diode 4.3V
2 x small touch buttons
1 x 470uF capacitor (biased)
1 x 4,7uF capacitor (biased)
1 x 1N4001 diode
1 x 74HC02 TTL IC
1 x 74F74 fast TTL IC
1 x 74HC390 TTL IC
1 x LM393 voltage comparator
1 x MAX903 high speed voltage comparator, 8 Pin plastic DIP package, you can
order it directly from www.maxim-ic.com in case your local dealer does not have
it in stock.
1 x 7805 5V regulator
1 x 2 line 20 character LCD display with HD44780 compatible
interface. With our without backlight (16 pin or 14 pin)
All LCD displays that I have ever seen with 14 or 16 pins on the
connector were HD44780 compatible. You can also use a 3 or 4
line display but then you will need to modify the software a
bit.
In addition to that you need some wires, connectors (BCD, power, RS232) and a 9V transformer or
some other AC or DC power supply (150mA). Sometimes you get very cheap
power supplies which plug directly into the wall socket and are used
for all kind of consumer electronics.
Schematic and board
I used eagle
for Linux to design the schematic and board. The program
has a few problems to understand that all the different power supply
pins on the ICs are 5V. You will therefore get some error if
you run the electrical rule check. The design is however correct.
The schematic (click on it for a bigger picture):
![[Schematic]](../../common/images/article253/schematic_small.gif)
The board (click on it for a bigger picture):
![[board]](../../common/images/article253/board_small.gif)
The board is specifically designed for hobby electronic.
Only the blue layer is meant to be etched as a printed circuit board.
The red lines are wires. It's much easier and less accuracy is required to
build a single sided printed circuit board. You can lay the wires (red)
such that they have the shortest length. I could not do that in eagle.
The board layout with white background for better printing:
board with white background (Note: This is not the file you need
to make the printed circuit board.)
The eagle files are all included in together with the software
(linuxfreqcount-0.4) which you can down load at the end of the article.
How it works
The AT90S4433 Microcontroller has two internal counters. One is 16bit wide
and one is 8bit wide. We use the 8bit wide counter to generate an
accurate time base from the frequency of the clock crystal of the
AT90S4433. For this purpose we use a 4194304Hz crystal and pulse the
8bit counter via a 1/256 internal pre-scaler (see data sheet of the AT90S4433,
download at the end of the article). The 8bit counter is configured to
generate an interrupt at overflow. In other words we get a
4194304Hz / (256 * 256) = 64Hz time base. By using a loop variable we
generate from this functions calls in 1Hz intervals or 64Hz intervals.
Now we have a function which is called in 1Hz or 64Hz intervals dependent
on the mode our counter software is running at. All we need to do now
is read out the 16bit wide counter from this function and display the
result.
The 16bit wide counter (pin PD5 on the Microcontroller) gets its
pulse signals from the signal that we want to measure.
The Microcontroller samples the input signals to synchronize it with
its internal clock. According to the sample theorem we can therefore
maximum measure signals up to half the crystal frequency. That's the
theoretical limit. In practice we can measure signals up to 1,5MHz with
the Microcontroller.
To measure higher frequencies we need a pre-scaler/divider. This is
what the 74F74 and the 74HC390 ICs provide. The 74F74 is used as
a fast asynchronous 1/4 divider and the 74HC390 is a 1/25 divider.
We can not use directly the 74HC390 as a 1/100 divider because it
can handle max 25MHz.
The circuit provides for 2 inputs. One via the 1/100 divider
and one direct input. Dependent on the frequency of the signal
that you want to measure you use one of those input lines (not both).
If you are only interested in frequencies up to 1.5Mhz
(e.g to set up measurements for the frequency response of an audio amplifier)
you can
also build a simplified version of the counter an leave away the
MAX903, 74F74 and the 74hc390. You can still use the same software and
circuit board.
The purpose of the 2 voltage comparators (MAX903, high speed, and LM393)
is to amplify the signals and generate square wave signals from e.g
sine wave signals.
Special care was taken during the board design and layout
to avoid oscillations of the
comparators near the threshold. You should also note that the MAX903 is
really a very high speed comparator. If you use a noisy input signal,
imagine e.g a 100KHz signal modulated with a 1MHz noise, then you will
count some additional 1MHz pulses when the 100KHz signal crosses the
zero voltage level.
The 220K resistor on the MAX903 avoids the
influence of noise to some degree by providing a positive feedback.
You should however not feed the counter with noisy signals.
The Microcontroller can be controlled via RS232 and via 2 push buttons
(clear button and change counting mode button).
The 2 input channels are combined via an OR gate (74hc02).
The OR gate would of course suppress input signals if you unplug
the 1/100 input while there is still a logical "1" on the output line
of the 74hc390. Therefore the 74hc390 is cleared (pin 2) when you change
the counting mode or when you press the clear button.
The software
The software for the Microcontroller sets up 2 counters in interrupt
mode. How this is done is described very well in the datasheet of the
AT90S4433 (see references). You have to set a number of registers. It's important but
rather dry. I will therefore not repeat it here.
Most of the frequency counter logic is implemented in the file
linuxfreqcount.c.
All other files are "libraries" for LCD, UART, etc.... When writing software
for the Microcontroller you must take care to not use more than
128Bytes of Ram. That's all we have. Therefore it is better to not have
nested function calls with a lot of parameters. Flags and global variables
are preferred.
When the counter registers are configured correctly then
the function SIGNAL(SIG_OVERFLOW0) will be called in 64Hz intervals.
Here we read out the 16bit counter and set a flag (hflag) to process the
counter result further, function handlecounterresult(). With 1Hz gate frequency
we can use the counter result directly but with 1/64 sec gate open time
we must multiply the result by 64. The mathematics you can do with
the Microcontroller are rather limited (we do not have nice 32bit integers as
in a Pentium CPU). Fortunately multiply by 64 is just 6 times shift left.
We store the final counter result in 3x 8bit variables (counterval[3]).
Now we have the correct counter value as a 24bit representation.
In order to display it, it needs to be converted to decimal ASCII. Printf
would normally do this but we don't have printf and it would exceed all
our memory. Do do the binary to decimal conversion we divide the
24bit number by 10 with reminder. The reminders are the decimal numbers.
Our CPU can not do 24bit math therefore we process the number in 8bit chunks
(function divby10()). Adding to each digit the ASCII value of zero provides
us finally with an ASCII representation of our number (function longtoascii()).
This ASCII string can then be sent over the RS232 line and to the LCD
display.
Making the printed circuit board
The software package contains a postscript file (linuxfcount.ps) for the printed circuit board.
Personally I find that the pads are always a bit too small. Therefore
I strongly recommend to enlarge them a bit with a paint marker before you
etch the board. The process how to make a board at home is described
in:
May 2002, A LCD control panel for your
Linux server. Some readers told me that Kontakt Pausklar-21 spray is
difficult to get. You can use petroleum, as used
for petroleum lamps, instead. You need to wash off the petroleum with
a bit of soap before you put the board into the developer.
How to build a box for our frequency counter?
![[final case, open]](../../common/images/article253/case_small.jpg)
![[wooden frame]](../../common/images/article253/woodenframe_small.jpg) A major problem for hobby electronics is usually the case or box
for all the nice circuits that you build.
pre-build aluminium boxes are usually expensive. Exact bending of
sheets of metal is difficult. I have fund a cheap and professionally looking
solution. I use fir wood for the sides and corners, you can paint it
a bit to make it look expensive. Use water soluble paint, paint for indoor use. For the front, the
top and the bottom I use sheet metal and they don't need to be bend. Just
cut them to the right size.
You can see in the picture on the right how the wooden
frame looks like. On the left you see the final case (the cover on top is
missing).
A major problem for hobby electronics is usually the case or box
for all the nice circuits that you build.
pre-build aluminium boxes are usually expensive. Exact bending of
sheets of metal is difficult. I have fund a cheap and professionally looking
solution. I use fir wood for the sides and corners, you can paint it
a bit to make it look expensive. Use water soluble paint, paint for indoor use. For the front, the
top and the bottom I use sheet metal and they don't need to be bend. Just
cut them to the right size.
You can see in the picture on the right how the wooden
frame looks like. On the left you see the final case (the cover on top is
missing).
Assembling the board
![[circuit]](../../common/images/article253/circuitonly_small.jpg) When soldering all the parts to the board you should pay some attention
to the high frequency area (MAX903 and 74F74 with resistors and capacitors).
I normally recommend to use a socket for ICs because it makes
fault finding trouble shooting easier but for these 2 ICs you should not
use sockets to reduce unwanted parasitic effects. For the decoupling capacitors
between ground and power supply you should use small ceramic capacitors.
The value of these capacitors can be anything between 10nF and 100nF.
When soldering all the parts to the board you should pay some attention
to the high frequency area (MAX903 and 74F74 with resistors and capacitors).
I normally recommend to use a socket for ICs because it makes
fault finding trouble shooting easier but for these 2 ICs you should not
use sockets to reduce unwanted parasitic effects. For the decoupling capacitors
between ground and power supply you should use small ceramic capacitors.
The value of these capacitors can be anything between 10nF and 100nF.
This is the most complex circuit we have designed so far in LinuxFocus.
I recommend to build it in steps and check in between that the different
components are working:
- Solder first the parts needed for the power supply (7805 etc...) on to
the board and test that this works.
- Solder all parts onto the board but put only the Microcontroller into
the socket.
- The linuxfreqcount-0.4 package includes a test program, avr_led_lcd_test.c,
for testing the Microcontroller, the LED and the LCD. Load it. Attach the programmer cable as described
in the first AVR article (March 2002, Programming the AVR Microcontroller with GCC) and then type "make testload"
to load the avr_led_lcd_test software form the linuxfreqcount-0.4 package.
The LED should blink and the LCD should show the text "Hello".
- Put all ICs into their sockets. Load the final software (make load). Test
again first the low frequency part and then the high frequency part. You need
some kind of oscillator as frequency source (square wave signal output preferred).
Using the counter
The counter can operate in different modes:
- continuous up counting
- frequency counting with a gate frequency of 1Hz. In this mode
you can measure frequencies up to the maximum of the 16bit counter, 65535Hz or 6553500Hz with 1/100 divider.
- frequency counting with a gate frequency of 64Hz. In this mode you can
count frequencies up to 1,5 MHz or 100MHz with 1/100 divider.
![[ASCII commands via rs232]](../../common/images/article253/screenshoot_small.jpg)
|
|
RS232 ASCII command interface.
|
You can change the mode via the mode button or via the RS232 interface
with ASCII commands. The RS232 ASCII command interface works as described
in the article May 2002, A LCD control
panel for your
Linux server. The available commands are described in the
README.commands
file.
The green LED indicates when the gate is open. That is: pulses can come
in to the counter and counted there.
The second button is the clear button. This button can be used to clear the
counter (mainly for count up mode) and to toggle between
multiply by 100 and normal display. The multiply by 100 causes the displayed result to be multiplied by 100. This way you don't have to do complicated math
in your head :-). It's useful when you use the 1/100 divider.
How accurate?
Any digital counter has a accuracy limit of +/-1. The last digit will always
toggle a bit even if you happen to have a very stable input signal.
If the gate frequency is 64Hz then the result is internally multiplied by
64 which means the accuracy is +/-64. In the same way the 1/100 divider influences
the accuracy of the result. This counter is however very good.
The main problem is the temperature drift of the 4194304Hz crystal. Crystals
oscillate slower when they are warmer. This is physics and you could only
eliminate it by controlling the temperature exactly.
It is possible to calibrate the counter if you find a
a good reference signal. You can calibrate it in software by inserting
small delays in the function handlecounterresult(). I compared the counter
results a against
a reference signal and found that my counter was nearly exact. Therefore
the calibrate delays are currently commented out in the source code. You can as well influence
the frequency of the crystal a bit by changing one of the 27pF capacitors
(you have to experiment with 10pF, 50pF etc..).
For normal home use there should be no need to calibrate anything.
Standard 4194304Hz crystals are very accurate.
The counter in operation
Here is a final photo of the counter in operation:
![[the frequency counter]](../../common/images/article253/inoperation_small.jpg)
For further study
In this article no application software is provided to automatically evaluate
the results under Linux. One could e.g image that you use this frequency
counter to measure wind speed in remote areas or any other events that can be translated
into digital frequencies. To write software under Linux to do long time
measurements in not very difficult. You can e.g modify the perl programs
from the article May 2002, A LCD control
panel for your
Linux server. If you are only interested in logging the results
into a file then you can just use the commands:
ttydevinit /dev/ttyS0
cat /dev/ttyS0 > your_logfile.txt
This assumes that the counter is connected to COM1 (=ttyS0).
That's easy, isn't it :-)?
References
Talkback form for this article
Every article has its own talkback page. On this page you can submit a comment or look at comments from other readers:
2005-02-11, generated by lfparser version 2.52
![[Schematic]](../../common/images/article253/schematic_big.gif)
![[board]](../../common/images/article253/board_big.gif)
![[final case, open]](../../common/images/article253/case_big.jpg)
![[wooden frame]](../../common/images/article253/woodenframe.jpg) A major problem for hobby electronics is usually the case or box
for all the nice circuits that you build.
pre-build aluminium boxes are usually expensive. Exact bending of
sheets of metal is difficult. I have fund a cheap and professionally looking
solution. I use fir wood for the sides and corners, you can paint it
a bit to make it look expensive. Use water soluble paint, paint for indoor use. For the front, the
top and the bottom I use sheet metal and they don't need to be bend. Just
cut them to the right size.
You can see in the picture on the right how the wooden
frame looks like. On the left you see the final case (the cover on top is
missing).
A major problem for hobby electronics is usually the case or box
for all the nice circuits that you build.
pre-build aluminium boxes are usually expensive. Exact bending of
sheets of metal is difficult. I have fund a cheap and professionally looking
solution. I use fir wood for the sides and corners, you can paint it
a bit to make it look expensive. Use water soluble paint, paint for indoor use. For the front, the
top and the bottom I use sheet metal and they don't need to be bend. Just
cut them to the right size.
You can see in the picture on the right how the wooden
frame looks like. On the left you see the final case (the cover on top is
missing).
![[circuit]](../../common/images/article253/circuitonly.jpg) When soldering all the parts to the board you should pay some attention
to the high frequency area (MAX903 and 74F74 with resistors and capacitors).
I normally recommend to use a socket for ICs because it makes
fault finding trouble shooting easier but for these 2 ICs you should not
use sockets to reduce unwanted parasitic effects. For the decoupling capacitors
between ground and power supply you should use small ceramic capacitors.
The value of these capacitors can be anything between 10nF and 100nF.
When soldering all the parts to the board you should pay some attention
to the high frequency area (MAX903 and 74F74 with resistors and capacitors).
I normally recommend to use a socket for ICs because it makes
fault finding trouble shooting easier but for these 2 ICs you should not
use sockets to reduce unwanted parasitic effects. For the decoupling capacitors
between ground and power supply you should use small ceramic capacitors.
The value of these capacitors can be anything between 10nF and 100nF.
![[ASCII commands via rs232]](../../common/images/article253/screenshoot.gif)
![[the frequency counter]](../../common/images/article253/inoperation.jpg)