|
|
|
| This document is available in: English Castellano Deutsch Francais Turkce Polish |

by Stefan Blechschmidt <sb/at/sbsbavaria.de> About the author: Being a trained electrician, I found myself in 1990 in front of a CAD workstation to develop a switch and control station. Obviously, I got infected by a then unknown 'virus', and that's just fine. Translated to English by: Jürgen Pohl <sept.sapins/at/verizon.net> Content: |
Temperature monitoring with Linux
Abstract:
Abstract: Linux server are performing their job reliably and safe, they
don't need any special attention, they run and run and run... But what
happens if the little penguin is getting too hot? The past summer did
show
us: we should give to our little friend a temperature monitoring system.
This article will show you how to install one with little effort for
about
10 Euros.
|
Brian C.Lane has written a program for the temperature sensor DS1820 from DALLAS Semiconductor It is not hard to assemble a temperature monitoring system with these two components and a handful of other parts.
Note:
Brian C.Lane has modified his page and discontinued the version I used.
You can therefore download it from here:
digitemp-1.3.tar.gz
Those
of you who want to use his current
versiondigitemp-3.2.0.tar.gz can download it from http://www.digitemp.com/software.shtml
.

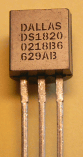
The sensor was originally produced by DALLAS Semiconductor
which has merged to Maxim/Dallas Semiconductor.
According to the data specification the sensor can measure
temperatures from -55°C to 125°C. The measurement data
are generated as a digital signal with a width of 9 bits. In
addition each sensor owns a 64 bit I.D. number, allowing to
interface (bus) a number of sensors. It is possible to utilize
100 sensors on a bus of a length of 300m .
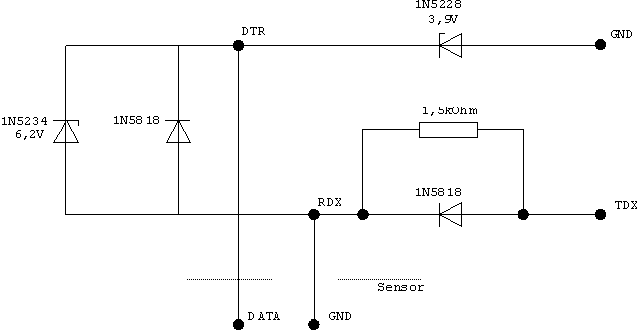
The circuit we are presenting here shall work with only 10
sensors on a bus of 60m. I am using at present 4 sensors on a
bus of about 12m.
You can find more information about the sensor in this Spec Sheet.
I want to add that the circuit presented here can measure only up to 75°C, which should be adequate for our application.
To be able to connect the sensor to the serial interface we need additional components. You will find them at most of the retailers of electronic parts, in the internet or -even better- in the electronics store around the corner.
| Quantity | Identification | Type | alter.Type |
|---|---|---|---|
| 1 | Resistor | 1,5 k Ohm | -------- |
| 2 | Schottky Diode | 1N5818 | BAT 43 |
| 1 | Zener Diode | 1N5228 | ZPY 3,9V |
| 1 | Zener Diode | 1N5234 | ZPY 6,2V |
| 1 | Sensor | DS18S20 | -------- |
| 1 | Socket, Serial | RS232C/9 | -------- |
| 1 | Connector Shell | SUB-D/9 | -------- |
| 1 | Breadboard | Laminated Paper | -------- |
Since the interface circuit is very simple I choose to assemble it on a breadboard. Sorry for my soldering artwork :-).
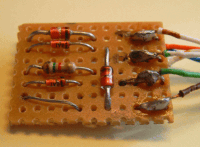
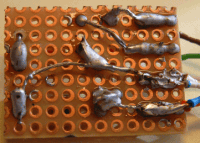
With some skills the components can be installed in the plug of the serial interface.
Note
On this page of LinuxNetMag
we can find an article on digitemp, also a forum
describing a circuit for measurements above 75°C. I have
not yet testet that circuit.
For our interface circuit only two contacts of the sensor are required, the connector VDD can be removed. I simply snipped it off :-).
Here is a table of the circuit of the interface card, the sensors and the serial interface.
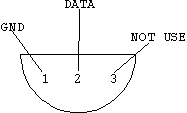
| Description | DB-25 | DB-9 | Sensor |
| DTR | 20 | 4 | Data (PIN 2) |
| RXD | 3 | 2 | GND (PIN 1) |
| TXD | 2 | 3 | |
| GND | 1 and 7 | 5 |
The software is available as a tar archive, it can be installed with the command:
tar -xvzf digitemp-1.3.tar.gzin the current directory.
In the newly installed directory
digitemp1-3 we find the source code,
documentation and some Perl scripts, but also the binaries
digitemp, which can be used as they
are.
If digitemp is invoked without parameters we
will get an overview of the parameters presented.
DigiTemp v1.3 Copyright 1997-99 by Nexus Computing

Usage: digitemp -s<device> [-i -d -l -r -v -t -p -a]
                -i                            Initalize .digitemprc file
                -s/dev/ttyS0                  Set serial port
                -l/var/log/temperature        Send output to logfile
                -f5                           Fail delay in S
                -r500                         Read delay in mS
                -v                            Verbose output
                -t0                           Read Sensor #
                -a                            Read all Sensors
                -d5                           Delay between samples (in sec.)
                -n50                          Number of times to repeat
                -o2                           Output format for logfile
                -o"output format string"      See description below

Logfile formats:  1 = One line per sensor, time, C, F (default)
                  2 = One line per sample, elapsed time, temperature in C
                  3 = Same as #2, except temperature is in F
        #2 and #3 have the data seperated by tabs, suitable for import
        into a spreadsheet or other graphing software.

        The format string uses strftime tokens plus 3 special ones for
        digitemp - %s for sensor #, %C for centigrage, %F for fahrenheight.
        The case of the token is important! The default format string is:
        "%b %d %H:%M:%S Sensor %s C: %.2C F: %.2F" which gives you an
        output of: May 24 21:25:43 Sensor 0 C: 23.66 F: 74.59
As 'Help' tells us the installed sensors need to be initialized. For this we need to define the interface to which our circuit is connected, as well as the parameter for the initializing.
The command
digitemp -i -s/dev/ttyS0accomplishes that, in this case the interface circuit is connected to the first serial interface.
The software detects the sensors, a message similar to this appears:
DigiTemp v1.3 Copyright 1997-99 by Nexus Computing

ROM #0 : 1032724700080086
ROM #1 : 1092214400080089
We notice that the software detected 2 sensors. In addition the file
.digitemprc will be created in the
current directory, it will contain the data of the sensors, the
interface and the output format.
With the command ./digitemp -a we are
now able to read the output of the sensors. Please note the
./ character, we are still in a directory
which is not part of the current search path.
Measurement Output
DigiTemp v1.3 Copyright 1997-99 by Nexus Computing

Sep 24 21:53:35 Sensor 0 C: 37.94 F: 100.29
Sep 24 21:53:38 Sensor 1 C: 10.62 F: 51.129
To integrate our program into our system we need to do a few adjustments.
First, we need to copy the binaries, e.g.
digitemp, in a directory which allows the
execution of programs without path definition. I
selected/usr/local/bin/ for this. Those who are
not sure about this can find the paths with echo
$PATH . Furthermore, the file
.digitemprc with the initializing data needs to
copied to the home directory of user who carries out the
measurements. To save the data in a file and not on the console
the switch -l[PATH/FILE NAME] needs to be
applied.
Now we need to automatize our measurements, the well tried
cron will do that. With crontab -u [USER]
-e we can set this up for every user. The entry
0-59/15 * * * * /usr/local/bin/digitemp -a -l/var/log/digitemp.loginitiates digitemp to execute a measurement every 15 minutes and to write them to
/var/log/digitemp.log .
With the command tail /var/log/digitemp.log we
can read the last lines of the measurements. If the file
/var/log/digitemp.log is not being generated,
please have a look at the file access rights.
The archive contains a few Perl scripts for the graphical interpretation. I am not going to describe them here. I am pondering the idea to write another article on how to collect sensor data in the data base mySQL and how to interpret them through a web interface.
This will mainly be done with Perl by using the function mySQL, CGI, graphic.
|
|
Webpages maintained by the LinuxFocus Editor team
© Stefan Blechschmidt, FDL LinuxFocus.org |
Translation information:
|
2003-11-01, generated by lfparser version 2.38