![[Photo of the Author]](../../common/images/Carlos_C.gif)
by Carlos Calzada Grau About the author: Graduate in computer science and fun of computer graphics since my first Spectrum. I am very enthusiastic about Linux, its development philosophy and anything that has nothing to do with micro$oft. Other of my non-screen related hobbies are bonsais and aquaria. Content: |
Renderman III![[Ilustration]](../../common/images/illustration42.gif)
Abstract:
This is the third article on a series about Renderman
(I,
II), this time we will discuss
one of the most important issues: the posibility of
modeling and animating a scene using "C" or "C++".
|
From the previous two articles it is clear that although it is possible to write an scene directly by typing a text file, it is however very tedious. For example, consider writing a ".rib" file to describe the motion of a bouncing ball! To make our lifes easier we have the possibility of writing "C" or "C++" applications that model the scene and animation in user defined functions which them send the ".rib" script to the standard output. UNIX pipes let us then send the generated Renderman commands directly to another process (like rendrib, rendribv, rgl) or redirect it to a ".rib" file.
Our previous installation of Blue Moon Rendering Tools created two new directories called lib and include. These contain four files of which only two are of our concern at this moment: ri.h a header file and libribout.a the library of functions. The header file should be copied to /usr/local/include and the libribout.a to /usr/local/lib (the experienced reader may choose to install them in other location). After installation of the library we are ready for our first example program.
Our first example demonstrate the very basics of Renderman programming. As in any C code, we must include the corresponding header file before using the library, in our case ri.h. Moreover we must link our program with the library, like this:
gcc myprogram.c -o myprogram -lribout -lm
Here is an example Makefile that will save time typing on the console:
LIBS = -lm -lribout PROGNAME = primero all: $(PROGNAME) $(PROGNAME).o: $(PROGNAME).c gcc -c $(PROGNAME).c $(PROGNAME): $(PROGNAME).o gcc -o $(PROGNAME) $(PROGNAME).o $(LIBS) |
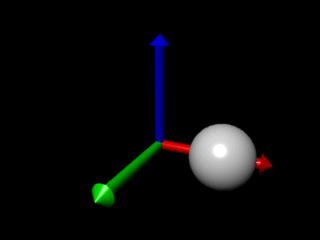
Our first example builds some axis of coordinates and a ball at the center, we will call it primero.c, here is the source code:
 1 #include <stdio.h>
 2 #include <math.h>
 3 #include <ri.h>
 4
 5 void main(void)
 6 {
 7  int i;
 8  int x,y,z;
 9  int nf;
10  float slopex,slopey,slopez;
11
12  RtColor Rojo={1,0,0};
13  RtColor Verde={0,1,0};
14  RtColor Azul={0,0,1};
15  RtColor Blanco={1,1,1};
16
17  RtPoint p1={30,0,10}; /* Posicicion inicial de la pelota */
18  RtPoint p2={0,20,10}; /*   Posicion final de la pelota   */
19
20  RtPoint from={0,100,100}; /*   Direccion de la luz       */
21  RtPoint to={0,0,0};
22
23  char name[]="primero.tif";
24  RtFloat fov=45;
25  RtFloat intensity1=0.1;
26  RtFloat intensity2=1.5;
27  RtInt init=0,end=1;
28
29  RiBegin(RI_NULL);
30    RiFormat(320,240,1);
31    RiPixelSamples(2,2);
32    RiShutter(0,1);
33    RiFrameBegin(1);
34     RiDisplay(name,"file","rgb",RI_NULL);
35     name[7]++;
36     RiProjection("perspective","fov",&fov,RI_NULL);
37     RiTranslate(0,-5,60);
38     RiRotate(-120,1,0,0);
39     RiRotate(25,0,0,1);
40     RiWorldBegin();
41       RiLightSource("ambientlight","intensity",&intensity1,RI_NULL);
42       RiLightSource("distantlight","intensity",&intensity2,"from",from,"to",to,RI_NULL);
43       RiColor(Azul);
44       RiTransformBegin();
45         RiCylinder(1,0,20,360,RI_NULL);
46         RiTranslate(0,0,20);
47         RiCone(2,2,360,RI_NULL);
48       RiTransformEnd();
49       RiColor(Verde);
50       RiTransformBegin();
51         RiRotate(-90,1,0,0);
52 	   RiCylinder(1,0,20,360,RI_NULL);
53 	   RiTranslate(0,0,20);
54 	   RiCone(2,2,360,RI_NULL);
55       RiTransformEnd();
56       RiColor(Rojo);
57       RiTransformBegin();
58 	   RiRotate(90,0,1,0);
59 	   RiCylinder(1,0,20,360,RI_NULL);
60 	   RiTranslate(0,0,20);
61 	   RiCone(2,2,360,RI_NULL);
62       RiTransformEnd();
63       RiColor(Blanco);
64       RiSphere(5,-5,5,360,RI_NULL);
65     RiWorldEnd();
66    RiFrameEnd();
67  RiEnd();
68 };
|
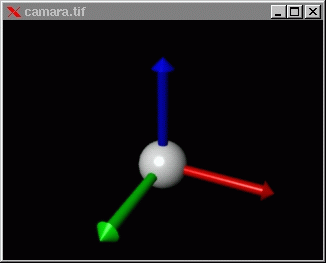
The first three lines are basic include files among which is the ri.h header of prototypes for the Renderman library. Every Renderman call has its equivalent C-style call in ri.h, thus TransformBegin corresponds to the function RiTransformBegin(), etc. Create the executable primero by running make. Our example can be executed to create an input file by redirection (primero > primero.rib) or by sending the output directly to another process (primero | rendrib). In last case, rendrib takes charge of generating a rendered file primero.tif:
The function calls from the library must be encapsulated between a RiBegin(RI_NULL) and a RiEnd() calls. The parameter passed to RiBegin is typically RI_NULL. To prevent the output of the RIB's to the standard output we could pass the name of the output filename * ("myfile.rib") or even the name of a process (like rendrib) the executable will then pass the renderman commands to the renderer without creating an intermediate RIB file.
The source code for our first example has typical C instruction plus types and functions intrinsic of the Renderman interface: the type RtColor is a vector of three real components for the value of red, green and blue (ranging from 0.0 to 1.0), then RtPoint holds a position in space and RtFloat and RtInt are the real and integer types respectively.
Line 29 contains a call to RiBegin(RI_NULL), which as we described earlier is an initialization call the Renderman interface. From here on follow the usual command functions one would have typed on a typical RIB file. Try running the code and redirecting the output to a file (./primero > primero.rib), the output should be:
##RenderMan RIB-Structure 1.0 version 3.03 Format 320 240 1 PixelSamples 2 2 Shutter 0 1 FrameBegin 1 Display "camara.tif" "file" "rgb" Projection "perspective" "fov" [45 ] Translate 0 -5 60 Rotate -120 1 0 0 Rotate 25 0 0 1 WorldBegin LightSource "ambientlight" 1 "intensity" [0.1 ] LightSource "distantlight" 2 "intensity" [1.5 ] "from" [0 100 100] "to" [0 0 0] Color [0 0 1] TransformBegin Cylinder 1 0 20 360 Translate 0 0 20 Cone 2 2 360 TransformEnd Color [0 1 0] TransformBegin Rotate -90 1 0 0 Cylinder 1 0 20 360 Translate 0 0 20 Cone 2 2 360 TransformEnd Color [1 0 0] TransformBegin Rotate 90 0 1 0 Cylinder 1 0 20 360 Translate 0 0 20 Cone 2 2 360 TransformEnd Color [1 1 1] Sphere 5 -5 5 360 WorldEnd FrameEnd |
Our first example is not so usefull. To generate another scene we have to write a new program that performs similar operations. The power of the library is really in the generation of animations. In the first example only one frame was generated, next we will make the ball move.
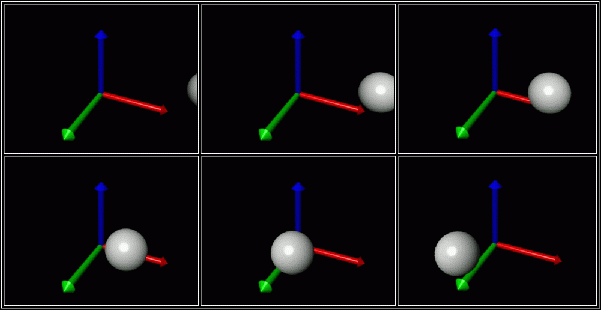
In the second example our scence consist once again of three coordinate axis and a ball, but this time the ball is going to move from the coordinates (30,0,10) to (0,20,10), that is from right to left on the computer screen. Both locations will be defined using RtPoint structures (lines 18 and 19). The number of frames or images for the animation is defined in the variable nf. Using this number and the initial and final positions one can calculate the step to take per frame in the three directions (slopex, slopey and slopez). This is all the information needed to modify the ball position as a function of the frame number. Between lines 75 to 78 a set of TransformBegin/TransformEnd takes care of defining the location of the ball. The new position at every step is computed very simply in line 76.
 1 #include <stdio.h>
 2 #include <math.h>
 3 #include <ri.h>
 4 #include "filename.h"
 5
 6 void main(void)
 7 {
 8  int i;
 9  int x,y,z;
10  int nf;
11  float slopex,slopey,slopez;
12
13  RtColor Rojo={1,0,0};
14  RtColor Verde={0,1,0};
15  RtColor Azul={0,0,1};
16  RtColor Blanco={1,1,1};
17
18  RtPoint p1={30,0,10}; /* Posicicion inicial de la pelota */
19  RtPoint p2={0,20,10}; /*   Posicion final de la pelota   */
20
21  RtPoint from={0,100,100}; /*      Direccion de la luz        */
22  RtPoint to={0,0,0};
23
24  char base[]="camara_";
25  char ext[]="tif";
26  char name[50];
27  RtFloat fov=45;
28  RtFloat intensity1=0.1;
29  RtFloat intensity2=1.5;
30  RtInt init=0,end=1;
31
32  nf=100; /*        Numero de frames         */
33  slopex=(p2[0]-p1[0])/nf;
34  slopey=(p2[1]-p1[1])/nf;
35  slopez=(p2[2]-p1[2])/nf;
36
37  RiBegin(RI_NULL);
38    RiFormat(320,240,1);
39    RiPixelSamples(2,2);
40    RiShutter(0,1);
41    for (i=1;i <= nf;i++)
42 	{
43 	RiFrameBegin(i);
44	  filename(base,ext,sizeof(base)+4,i-1,name);
45	  RiDisplay(name,"file","rgb",RI_NULL);
46	  name[7]++;
47	  RiProjection("perspective","fov",&fov,RI_NULL);
48	  RiTranslate(0,-5,60);
49	  RiRotate(-120,1,0,0);
50	  RiRotate(25,0,0,1);
51	  RiWorldBegin();
52	    RiLightSource("ambientlight","intensity",&intensity1,RI_NULL);
53	    RiLightSource("distantlight","intensity",&intensity2,"from",from,"to",to,RI_NULL);
54	    RiColor(Azul);
55	    RiTransformBegin();
56	    	RiCylinder(1,0,20,360,RI_NULL);
57	  	RiTranslate(0,0,20);
58	  	RiCone(2,2,360,RI_NULL);
59	    RiTransformEnd();
60	    RiColor(Verde);
61	    RiTransformBegin();
62		RiRotate(-90,1,0,0);
63		RiCylinder(1,0,20,360,RI_NULL);
64		RiTranslate(0,0,20);
65		RiCone(2,2,360,RI_NULL);
66	    RiTransformEnd();
67	    RiColor(Rojo);
68	    RiTransformBegin();
69		RiRotate(90,0,1,0);
70		RiCylinder(1,0,20,360,RI_NULL);
71		RiTranslate(0,0,20);
72		RiCone(2,2,360,RI_NULL);
73	    RiTransformEnd();
74	    RiColor(Blanco);
75	    RiTransformBegin();
76		RiTranslate(p1[0]+slopex*(i-1),p1[1]+slopey*(i-1),p1[2]+slopez*(i-1));
77		RiSphere(5,-5,5,360,RI_NULL);
78	    RiTransformEnd();
79	  RiWorldEnd();
80	RiFrameEnd();
81	}
82  RiEnd();
83 };
|
Next let us try out the second example as before: compile and execute it redirecting the output to rendribv, for example. This is a simple method to quickly preview our animation and at an acceptable rate. To examine the rib output file just send the standard output to a new file. The reader can check that the size of the generated file is quite large (segundo.rib occupies 70kb) since the same scene is defined 100 times (one per frame).
The following figure shows a few intermediate frames in the animation:
Of course we may animate any object we wish: the position of the objects, their size, the intensity of the light, the camera, making things appear and disappear, etc.
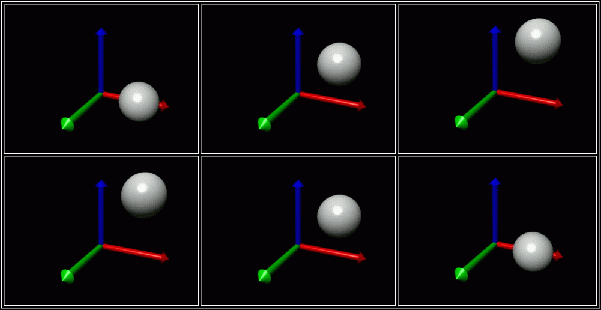
In the last example let us see how to make the ball bounce from the floor. We first define the function rebote() (meaning bounce) which takes three parameters: the number of the current frame, the number of total frames per bounce and the maximum height the ball can reach. Here is the implementation:
float rebote (int i, int nframes, int max)
{
  float min, z;

  while (i > nframes) i-=nframes;

  min=sqrt(max);

  z=i-((float)nframes/2.0);
  z=(z*min)/((float)nframes/2.0);
  z=(float)max - (z*z);
  return(z);
}
|
With a few simple calculations one maps the typical parabola curve (y=x^2) to the number of frames and the maximum height desired. The following figures show some intermediate images generated per bounce by the program tercero.c:
I am supplying a few animated GIF files to visualize the animations, although they run slow (at least under Netscape) with xanim you should be able to see then at an acceptable speed:
Rectilinear Movement: segundo_anim.gif
Parabolic Movement: tercero_anim.gif
This last example ends our presentation of the basics of the C interface to Renderman and its programing. The most advanced and most spectacular programming subject is the topic of shaders. They provide the ultimate control over the final rendering of the scene since it allow us to control the textures, ilumination, etc..
Translated by Miguel A Sepulveda
|
Webpages maintained by the LinuxFocus Editor team
© Carlos Calzada Grau, FDL http://www.LinuxFocus.org |
2005-05-06, generated by lfparser version 2.52