![[Photo of the Author]](../../common/images/Carlos-C.gif)
by Carlos Calzada <ccgrau /at/ disca.upv.es> About the author: I am computer science student (for the moment) and since I had a Spectrum I have always like graphics, I am also a fan of Linux and of anything that has nothing to do with Micro$oft. Two of my non-computer related hobbies are bonsais and fish-pools. Translated to English by: Miguel Angel Sepulveda <sepulveda /at/ linuxfocus.org> Content: |
Basics on Camera Positioning![[Ilustration]](../../common/images/illustration39.gif)
Abstract:
In this second article about RenderMan we discuss the configuration and positioning of the camera and we will also examine some of the special effects that can be achieved. Although the positioning is not as intuitive as Pov-Ray, it has an advantage when describing camera trajectories. Part of this last issue will be treated in a third article |
In this second article we explore in detail the camera model in RenderMan. The camera is one of the most important elements of a renderer, it allows to generate the most interesting effects, like Motion Blur (what we observe when taking a picture of a moving object) and Depth of Field (focusing). Although many more effects could have been modeled in the camera for example Lens Flare (the flare observed in photos of lights) that would have made the model too complicated. Instead many of these effects are achieved by modifying the properties of the objects using an advanced system of shaders (shader understood as tools to render textures on objects). Using families of shaders we can build our own "shaders" and generate quite impressive effects. The procedure to program and compile these shaders will be discussed in other article, although this is a very extensive subject (very very extensive and right now I have not much ideas,,,, so I have to prepare it better).
As explained in the previous article, to render an image we must write:
rendrib fichero.ribfor output to file or
rendrib -d fichero.ribfor output to screen
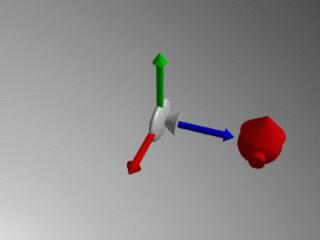
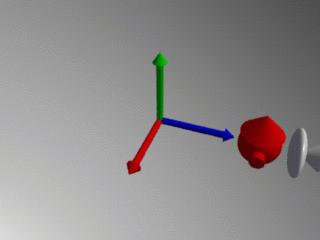
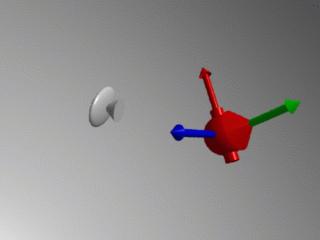
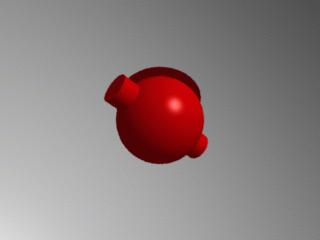
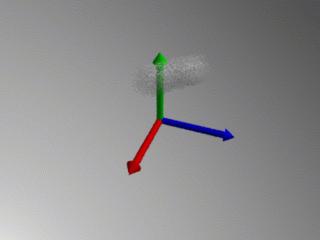
The coordinate system for the camera is "left-handed" and coincides with the surface of the monitor. The origin is located at the center of the screen with the x axis pointing to the right, the y axis upwards and the z to the interior of the monitor. By default, the "current system of coordinates" is identical to the camera system of coordinates, exactly as illustrated on the first image (the x is in red, y in green and z in blue). The first image shows a bird's eye view of the scene and the second is the proper scene (the sources of light are not located in the same positions in both images in order to make them more clear). Even though the scene is not particularly complex (the truth is that it looks horrible) it will serve to understand the RIB example files without cluttering them with complex geometrical models.

Next let us examine how to position the camera. The most logical thing to do, especially for users of Pov_ray, is to move the camera. To view the scene from a more distant point we would like to translate the camera to the position <0,0,-20>, this is the same as moving backwards the camera. Under Renderman this translation is performed using the command Translate 0 0 -20 previous to WorldBegin:

However the command has moved the camera forward! Actually it was not the camera that moved but the system of coordinates, the whole system of coordinates was translated backwards thus leaving the camera in front. Therefore, to move the camera backwards we must do the contrary, a forward translation and think of it not as moving the camera but has moving the system of coordinates (with Translate 0 0 20):
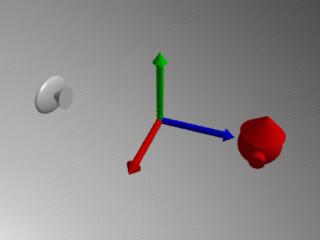
Now the camera is exactly where we wanted it. From now on any change of geometry in the scene will refer to the present system of coordinates. In the next example the model stays at the origin but we rotate the camera around it:
Take a look at the RIB file with the geometrical transformations apply on the camera:
Display "camara_default2.tif" "file" "rgb"
Projection "perspective" "fov" 45
Format 320 240 1

LightSource "ambientlight" 1 "intensity"
            0.3 "lightcolor" [1 1 1]
LightSource "distantlight" 2 "intensity"
            1.0 "from" [10 10 -10] "to" [0 0 0]

Translate 0 0 20
Rotate 45 1 0 0
Rotate 135 0 1 0

WorldBegin
    Color 1 1 1
        # Background blanco
    Sphere 10000 -10000 10000 360

    # Objects in the scene
    TransformBegin
        Color 1 0 0
        Sphere 3 -3 3 360
    TransformEnd
    TransformBegin
        Rotate -90 1 0 0
        Translate 0 0 2
        Cone 3 3 360
        Disk 0 3 360
    TransformEnd
    TransformBegin
        Rotate -90 0 1 0
        Cylinder 1 -4 4 360
        Disk 4 1 360
        Disk -4 1 360
    TransformEnd
WorldEnd
There is a translation (Translate 0 0 20) and two rotations, one about the x axis (Rotate 45 1 0 0) and the other about the y axis (Rotate 135 0 1 0). Perhaps the order of operations in this example may appear confusing to Pov-Ray users since in the later operations are applied in the order of appearance, but that is not the case in RenderMan. RenderMan queues operations until it finds a significant token (in our example WorldBegin), only then these operations are applied to the scene. Due to the queuing system of operations they are applied in the reverse order of appearance, in other words, the last operation specified is executed first. Therefore the geometrical operations in our example should be interpreted like this:
| 1. Initial State | 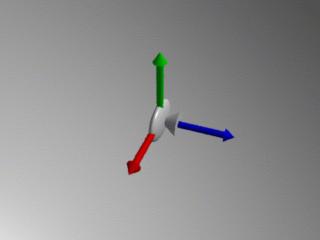 |
| 2. Rotate the system of coordinates by 135 degrees about the y axis | 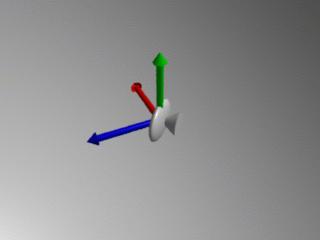 |
| 3. Rotate the system of coordinates by 45 degrees about the x axis | 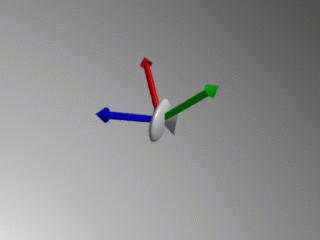 |
| 4. Translate the current system of coordinates 20 units along the z axis | |
Never forget that all the transformations of the current system of coordinates (rotations and translations) are always relative to the camera, therefore a rotation about the x axis should be understood as a "rotation about the x-axis of the camera"
Now we will pass to the most interesting part of the article, how to use RenderMan's camera model to generate special effects.
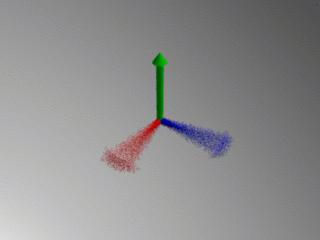
The first camera effect is Motion Blur, an effect that mimics the trace left on film by moving objects.
Motion Blur is specified by inserting the statement Shutter 0 1 in the section of our example file concerned with the camera specs. The command Shutter 0 1 simulates the time of exposure, in this case the shutter of the camera is to open at time 0 and stays open for 1 time unit. The parameters 0 1 for the shutter are quite universal and we will always use this paramters since it only indicates a particular behaviour of RenderMan's camera.
Next we must indicate RenderMan what elements in the scence are in motion, to do so we insert the pair of tags MotionBegin MotionEnd. The following figures shows an example (and its RIB file) of a ball moving from position 0 10 5 at time 0 to 5 10 0 at time 1. The statement MotionBegin [0 1] in the RIB file tells RenderMan what exact times correspond to the transformations (instant 0 corresponds to the first and instant 1 to the second) and the values must coincide with those expressed in the Shutter section. The figure clearly shows that the effect seems quite realistic and in an animation causes an even greater impact.
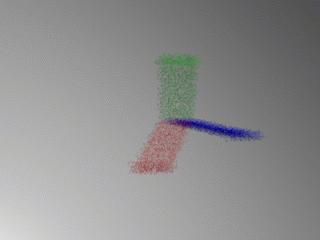
Of course, the translations allowed between MotionBegin MotionEnd are not limited to translations, RenderMan can render nonlinear trajectories with Motion Blur. In the next example we show a rotations of the coordinate axis 25 degrees about y axis
Under normal circunstances only objects in the scene move. RenderMan however also allows the possibility of moving the camera itself, therefore the effect of Motion Blur can be applied to the camera as well. In this example, we will move the camera 5 units to the right (i.e. move the system of coordinates 5 units to the right), and all the objects in the scene will become blur. Of course the pair of tags MotionBegin MotionEnd must be placed in the RIB file within the section for the camera :
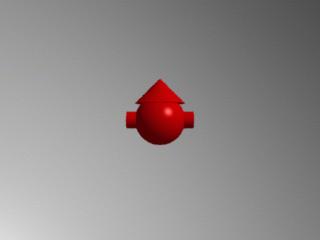
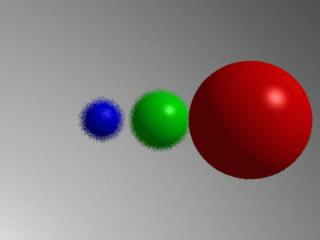
Finally another interesting effect offered by RenderMan is the "Depth of Field", or the camera focusing mechanism. The statement used to specify this feature is DepthOfField. This token requires three parameters: f-stop, fov (field of view) and focus-lenght (focal length). The first parameter, f-stop, specifies the cut-off distance for the focusing tool, in our example an object 2 units or less away from the camera will appear equally defocused (or focused). The parameter fov is usually left with the value 1.0 when previously the perspective has been defined as Projection "perspective" "fov" 45 (as in our example), changing the value to something different than one will just multiply the perspective field of view by that magnitude. At last focus-lenght is the parameter we are really interested in, it defines the distance objects must be located in order to appear on the image out-of-focus. In the following example the camera is at the origin and the three balls (10, 20 and 30 units away) and we will display several examples using several focus-lenght parameters.
The first image uses DepthOfField 2.0 1.0 10, which means that any object located 10 units from the camera will be on-focus (red ball):
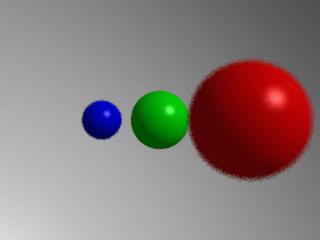
In the second case, DepthOfField 2.0 1.0 20. Now the green sphere, located at 20 units from the camera, is on-focus:
Finally to see on focus the last sphere (located 30 units away) we must specify DepthOfField 2.0 1.0 30:

The effects achieved give greater reality to the generated images. Of course the computational time required to generate these images increases, both Motion Blur and Depth of Field require several passes through the renderer.
|
Webpages maintained by the LinuxFocus Editor team
© Carlos Calzada, FDL http://www.LinuxFocus.org |
Translation information:
|
2005-05-06, generated by lfparser version 2.52