![[LinuxFocus Image]](../../common/May1998/border-short.jpg)
| News Archives Companies Tips |
GLUT: Using Menusby Miguel Angel Sepulveda |
|
This article is the third in a series concerning the GL Utility Toolkit (GLUT) written by Mark Kilgard. GLUT is a very useful tool kit for OpenGL developers because it abstracts in a simple to learn and simple to use API the architecture-dependent part of the OpenGL application. As discused in previous articles by design reasons OpenGL only includes the architecture independent directives of an advanced 3D API. Opening windows, handling keyboard input, etc.. are strongly platform dependent and therefore it is out of the scope of OpenGL. GLUT is an answer to this problem: GLUT offers a common interface to multiple platforms for handling things like windows, double buffering, text rendering, keyboard input and menus.
Today we will explore the use of menus within our OpenGL applications. A menu is one more means of user-application communication. In our previous article (Windows Management) we demonstrated another technique for user input, hot keys. GLUT captures keyboard input events as well as mouse button events and let us register callback functions to handle those incidents. The disadvantage of "hot keys" is that they are invisible, they require the user to read a manual or remember which key does what. Menus on the other hand are much more flexible because they are graphical and show the user the options currently available. As an example here are the sources of a program example (../../common/May1998/example1.tar.gz). This program is a modification of the example shown in our previous article Windows Management. Download the program and compile it using the makefile provided. 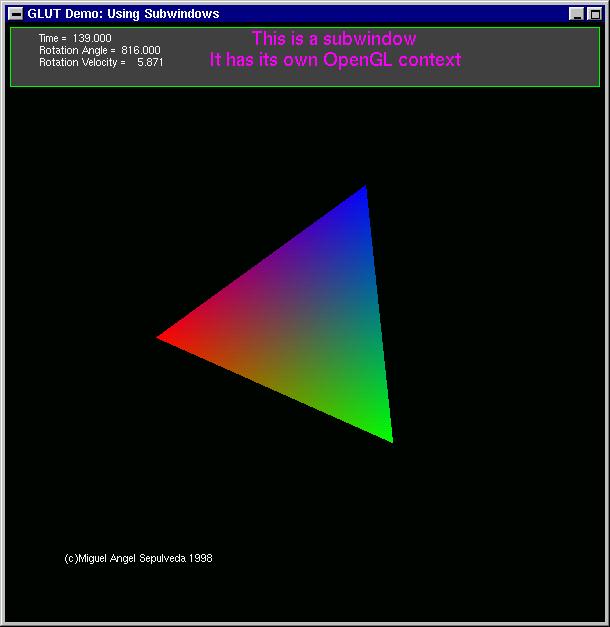
The compilation requires an OpenGL library (for example Mesa) and the GLUT library. Both libraries are widely available and included in one way or another in most Linux distributions. Upon compilation we get an executable file, example1 . Run it and you should see a new window with a color triangle of red-green-blue vertices (see left figure). The frame contains a main window with black background and a triangle in the middle and a sub-window with grey background and some text written on it. Our example is actually a real time animation so the time field in the sub-window should be moving forward. Move the mouse arrow to the area of the main window, next click and hold the left mouse button. This event is handle by our example and it should open the following menu: 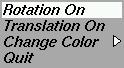
The menu contains three actions (switch on rotation, switch on translation, change color) and a final option to quit the application. While holding the left mouse button, move to every action and test it to see what happens. By selecting "Rotation On" the triangle will start rotating around its center of gravity, the "Translation On" menu item will move the triangle horizontally across the window and wrap it around the screen when the end is reached. The "Change Color" option will trigger a sub-menu with these new options: 
This is a very simple example of the usa of menus within an OpenGL application. The appearance of the menus and sub-menus is platform dependent. The look shown here is representative of Linux GLUT. compiled and run under Windows 95/NT, the menus will have a different appearance. What counts is that the functionality is portable as long as you use the GLUT library. Notice that the main menu has two different types of menu entries. The first type (Rotation On, Translation On) actually changes when the requested action is executed. This means that after you launch the triangle into rotation mode, the next time you view the main menu it will read "Rotation Off". The other type of menu entry remains alway constant, like "Change Color", "Red", "Blue" and "Green". There are a few more interesting things I would like the reader to be aware off before continuing on to describe how to program these menus. Do you remember that this demo had two hot keys? (Windows Management). Those keys are "q" to quit and "i" to switch the informational banner on and off . Try them out right now, they still work. While the informational banner is on (sub-window) move the cursor anywhere inside the grey region and click the left mouse button. Surprise! You should see this other menu: This demonstrates that menus are attached not only to events (left mouse button) but they are translated according to the current OpenGL context. We already mentioned in our previous article that a GLUT sub-window carries its own OpenGL context, here we see another consequence of that fact. Two menus have been attached to the same event but different context. The developer then has a powerful tool to write a very sophisticated user interface for his/hers applications. Even more interesting is the fact that if you switch off the informational banner using the i-key and move the cursor to the upper part of the frame, you will be unable to get back to the "This is a dummy menu" entry. Why? Because when hiding the sub-window the whole context (including attached menus) are hidden as well. Next let us start describing the contents of the program. I assume readers are already familiar with the GLUT & OpenGL material presented in previews articles. The main() contains several distinct sections, the order is important!:
Except for the menu creation, all the other sections should be familiar already to the reader. A rapid inspection of the menu creation code reveals how simple it is. Menus are created by the directive int glutCreateMenu( void (f*)(int) ) , the function f is a callback function that takes the number returned by the menu item triggered and performs an action accordingly. The value returned by the glutCreateMenu is an integer identifier for the newly created window. The callback functions used to handle menu events are quite simple. Examine void mainMenu(int) or void subMenu(int). They basically wrap a switch statement that processes the menu items requested. After a menu is created our code adds items to it using the function void glutAddMenuEntry(char *s, int nr), where s is the text to be written on the menu item field and nr is the id pass to the callback function when this menu item is selected. Obviously avoid using identical id's for menu items on the same menu. Sub-menus are added in a similar fashion by using the function void glutAddSubMenu(char *s, int nr). Finally, upon completion of the menu it is attached to an input event (left mouse button) by using the glutAttachMenu function. This function can also take GLUT_RIGHT_BUTTON, GLUT_MIDDLE_BUTTON. Menu items can be changed on the fly thanks to the command void glutChangeToMenuEntry(int entry, char *s, int value), which changes the menu item "entry" of the current window for another one that has the label s and returns value to the callback function. In our example, we used glutChangeToMenuEntry(2, "Translation On", 2);to just relabel the entry number 2 of the main menu, and so on with the other cases. GLUT allows for more possibilities: change a menu item into a cascading sub-menu and vice-versa, destroy menus, remove menu items, and more. We will not explore those here because I believe the current example is simple and functional enough to satisfy the needs of most users. If you need extra functionality please take a look at the most recent GLUT manual book. |
- Read other articles in this series: Windows and Animations, Windows Management.
- Consult the GLUT manual included with the sources.
This website is maintained by Miguel A Sepulveda.