![[Photo of the Author]](../../common/images/Who.gif) Phil Ross L'Autore: |
Creare ed elaborare animazioni con il GIMP![[Ilustration]](../../common/images/illustration28.gif)
Riassunto: Nel nostro spazio abituale sul GIMP descriviamo alcune tecniche per creare ed elaborare animazioni usando il GIMP. Salve, e benvenuti al mio terzo tutorial riguardo al GIMP su Linux Focus. Questa volta non mi baserò su nessun lavoro di Manuel, ma farò qualcosa da solo con il GIMP. Vorrei mostrarvi qualcuna delle sue capacità con le animazioni. Non sono molto complesse, ma sono buone abbastanza da essere utili. Prima di tutto chiariamo cos'è un'animazione. Animazione deriva dalla parola latina anima, che significa vita o spirito. Un'animazione, al contrario di un'immagine immobile, sembra possedere vita. Poichè una caratteristica comune di molte forme di vita è il movimento, quale modo migliore per dare vita ad un immagine che non farla muovere? Per quanti non siano familiari a questo soggetto, il metodo tradizionale usato dagli artisti per far muovere le loro immagini è di creare in effetti molte immagini. Ogni immagine rappresenta un'istante diverso della scena nel tempo, chiamato frame, e questi frame sono organizzati in ordine cronologico, dal primo all'iltimo. L'animazione è semplicemnte la proiezione in successione di questi frame. Un'animazione può sembrare molto reale se vista alla velocità giusta. La velocità di un'animazione è meglio nota con il nome di "frame rate" ed è generalmente intesa in frame per secondo. E ora vediamo cosa il GIMP ha da offrirci a riguardo.
Bene, questa sera sono in vena di fare un po' di vecchio e sano sfottò nei confronti della Microsoft. Se questo vi offende, mi scuso... non intendo essere infantile, solo divertente. Comunque, voglio realizzare una piccola animazione sulla Microsoft, quindi la prima cosa da fare è realizzarne il logo in caratteri neri su fondo bianco. Il carattere più simile all'originale che sono riuscito a trovare è l'"Eras". Con questo carattere non si possono inclinare le lettere, ma se fosse possibile arriveremmo molto vicini all'originale. E' comunque abbastanza simile per il nostro esempio... non c'è bisogno che si perfetto.  So now what I am going to do is make the Microsoft logo fall off the bottom of the picture. I'm going to open the Layers & Channels dialog box, and click on the Duplicate Layer button, which is the button showing two sheets of paper, one over top of the other, as its icon. This will create another copy of the layer, and I'm going to slightly modify this new layer, which is the one that will be on top. I'm going to click on the layer to make sure it is active, then choose my Rectangular Select tool from the toolbox. I am then going to go to the image window and select the last letter of the logo, which is a "t" and create a select box around it. After it is selected and you get the animated selection border (they look similar to marching ants), and when you put your mouse cursor inside the select region, it becomes a 4-directional cross. This means you can click and drag that selected region to move it. What I then want to do is move it down slightly about 5 pixels or so. I will then hit Ctrl+H to anchor the newly moved region to where it is now.  Next I want to go back to my Layers dialog box and duplicate the top-most layer to make a third layer. I will then click on the new top layer to activate it, make sure my Rectangular Selection tool is selected from the toolbox, and then go back to my image window. Next I select the last TWO letters of the logo, which are "f" and "t" and move the newly selected region down about 5 pixels or so.  It may be hard to see on this example page, but the letters are beginning slowly and smoothly drop off. So to make the logo drop completely off, I'm going to continue to duplicate each top layer, activate the new top layer, select one more letter than I did the previous time, and move them down about 5 pixels. I basically want to do this until the logo is gone. Beware, there might be a few problems you run into. I found it easiest to make the lower layers that I was done with invisible while I worked on the top layers. This can be done by clicking on the eye icons in the Layers dialog box which turns off the eye icon for that layer. Also, when you move a region down, any area that used to be covered by that region, but is no longer covered, might become transparent. In this case you will have to choose your pencil or paint brush and paint over it.
So now we have our witty little animation representing the downfall of Microsoft, and we want to save it so that we may put it on our webpage. GIMP allows us to save this animation as an animated GIF which hopefully will allow web browsers to enjoy watching it as much as we enjoyed creating it. Before saving as GIF though, we need to make sure our image is in indexed-color format instead of RGB. The title of the image window will give us this information in parentheses. If it says RGB and not indexed, you'll have to right click on the image window to get the menu, and then choose Image->Indexed. We then get a message from GIMP telling us that 255 colors or less is optimal if we are making transparent or animated GIFs. We then get an Indexed Color Conversion box which let's us choose some options for the conversion. I just go with the defaults and click OK. The title bar then shows that the image has been converted to indexed color. Now we want to actually save the image, so let's go to the image window and right-click to get our menu. Choose File->Save As to bring up the Save Image box. Then we choose the location to save the file and type in the filename in the proper place. I called my animation DownfallOfMicrosoft.gif, and GIMP automatically determined that it was to save it in GIF format, and then I clicked OK. Now the Save As GIF box appears and let's us choose some options for the file format. You can choose to have the file saved in interlace format or not. You can choose to save a comment in the file, you can choose to have the animated GIF loop constantly, you can set the default delay between frames for the frames that you didn't specify a delay time for in the Layers dialog box, and you can choose how you the frames interact with each other during the animation. These options are purely a matter of preference, so experiment with them and see which makes your animation look best. So here is my resulting animation below. Very simple but you can obviously do way more if you are creative enough. I could have included a powerful Linux logo that would come stomping down from above, but with my luck I would include it in this article and receive threatening calls from some Microsoft lawyers. 
|
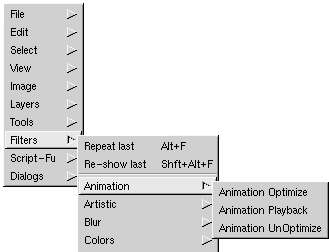 Credo che sia nel primo che nel secondo tutorial abbiamo discusso ed usato la
funzione Layer el GIMP. Possimao fare cose egrege con i layer, e crediateci o
no essi giocheranno un ruolo principale anche nella creazione di un'immagine
animata. In breve, ogni layer svolgerà la funzione di un singolo frame. Il
frame più profondo sarà il primo dell'animazione, e i successivi saranno
mostrati dal più profondo al più superficiale usando l'opzione Animation
Playback dal menu' dei filtri. Perciò andiamo avanti e creiamo una piccola
animazione come esempio.
Credo che sia nel primo che nel secondo tutorial abbiamo discusso ed usato la
funzione Layer el GIMP. Possimao fare cose egrege con i layer, e crediateci o
no essi giocheranno un ruolo principale anche nella creazione di un'immagine
animata. In breve, ogni layer svolgerà la funzione di un singolo frame. Il
frame più profondo sarà il primo dell'animazione, e i successivi saranno
mostrati dal più profondo al più superficiale usando l'opzione Animation
Playback dal menu' dei filtri. Perciò andiamo avanti e creiamo una piccola
animazione come esempio.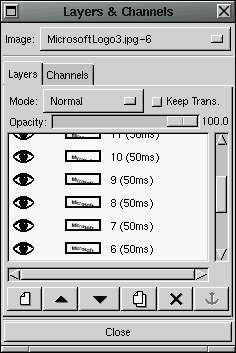 After going through this process I had 15 frames total. I renamed the
frames and put numbers beside each frame by double clicking on the text in
each layer. And here is another hint. In the title of each layer, you
can specify a millisecond time value in parentheses and the Animation
Playback filter will show that particular frame for that amount of time.
This way you can control the framerate of the animation on a per-frame
basis. You do not have to keep the frame-rate constant, but can change it
with each frame. For my logo example I used a 50 millisecond delay
time for each frame.
After going through this process I had 15 frames total. I renamed the
frames and put numbers beside each frame by double clicking on the text in
each layer. And here is another hint. In the title of each layer, you
can specify a millisecond time value in parentheses and the Animation
Playback filter will show that particular frame for that amount of time.
This way you can control the framerate of the animation on a per-frame
basis. You do not have to keep the frame-rate constant, but can change it
with each frame. For my logo example I used a 50 millisecond delay
time for each frame.