![[Photo de l'auteur]](../../common/images/Andre-Pascual.jpg)
by André Pascual About the author: Originally an industrial designer, now a professor of production, he teaches CAD. Computer graphics, especially 3D graphics, is one of his passions. Content:
|
![[Illustration]](../../common/images/illustration112.gif)
Abstract:
Some very expensive commercial products, such as Painter5, let you "paint" with fire; others, such as Photoshop or Paint Shop Pro let you, using the tools at your disposal, create the illusion of an object on fire. The GIMP under Linux, considered as the free equivalent of Photoshop, should produce the same result. In this article we show a procedure in five steps and eleven images, easily adapted to Photoshop and Paint Shop Pro, on how to creat fire effects with The GIMP.
A logo is easy to create in The Gimp because it is a base function of
the program.
Choose Xtns -> Script-Fu -> Logo -> Glowing Hot
Preserving the default parameters, the colours and the font "Slogan"
is evocative of fire (but it's up to you to decide if any other logo would
do as well: try them!)
Enter the text "Flammes", confirmed by OK (see Figure 1).
![[Figure 1]](../../common/images/article112/fig1_9A.jpg)
We want a transparent background to integrate the text in another image. We must, then,
remove the black background:
Right click on the image ->Layers -> Layers & channels
Select the Background layer
Eliminate it by clicking the X in the dialog box.
Right click on the image -> Layers -> Merge Visibles Layers
Then right click on the image -> Edit -> Copy
The text object is in the clipboard, ready to be pasted:
![[Figure 1.1]](../../common/images/article112/fig11_9A.jpg)
The text object has the approximate dimension 560x200, so
create an image capable of accepting it:
File -> New >Width 600 >Height 300 >RGB >Background ->OK
The new image comes with a white background which we are going to
paint with a Black/Yellow gradient
Black is already available, you must replace white by yellow:
Click on the white, then enter in the palette the values R255/G148/B0 ->OK
Double click on "Fill with a color gradient".
The default option will be Gradient Linear; if that's not the case, then
select it.
On the white background, draw a vertical from bottom to top.
The white background is replaced by the gradient (see step 2)
![[Figure 2]](../../common/images/article112/fig2_9A.jpg)
Right click on the image -> Layers-> Layers & channels-> New Layer->
Layer Name: Text-> OK
By default, the new layer is active
Minimize the dialog box (or close it)
Select the "gradient" image then right click -> Edit -> Paste
Position the text object at the bottom of the image (in the dark area)
Unselect it (see step 3)
![[Figure 3]](../../common/images/article112/fig3_9A.jpg)
You need two layers for this: one for the form of the flames, the other for the colour by combining with the preceding.
Create a layer "Fire1"
Paste the text object in the same position as the first.
The layer "Fire1" will be active,
select Keep Trans (to preserve the transparency)
then select a very pale yellow R251/G247/B128 and a circle brush of 19x19 by
Files -> Dialogs -> Brushes
Paint the layer "Fire1". Because of the Keep Trans option, only the
text is painted
Deselect Keep Trans when the painting is finished.
Deform the text of "Fire1" with:
Filters -> Distorts -> Shift -> Shift verticaly ->Shift Amount :50 ->
OK
Filters -> Distorts -> Waves -> Amplitude 12 -> Phase 0 -> Wavelength
50 -> OK
At this point of the process, the contours are very good for the flames. (See Figure 4_1)
![[Figure 4.1]](../../common/images/article112/fig41_9A.jpg)
![[Figure 4.2]](../../common/images/article112/fig42_9A.jpg)
Copy the layer "Fire1" (the layer will be active)
Create a layer "Fire2". Paste the flames of "Fire1" on the layer.
Select Keep Trans, and paint in red R247/G79/B56
Change the mixing mode of layers: depending on the desired flame colour,
you could choose the mode: screen, overlay, lighten only or
color. (see Figure 5). For the present example, we have chosen the mode
"overlay"
![[Figure 5]](../../common/images/article112/fig5_9A.jpg)
Raise the layer "Text" to the top in the Layers & channels dialog box (see Figure 6)
![[Figure 6]](../../common/images/article112/fig6_9A.jpg)
Select the layer "Background"
Script-Fu -> Decor -> Lava (preserve the default values) -> OK
A layer "Lava Layer" is automatically created just above the "Background" layer
Mix them in mode Color
Flatten the image by Layers -> Flatten Image (see Figure 7)
![[Figure 7]](../../common/images/article112/fig7_9A.jpg)
The flames may appear too pale (according to taste).
You can change them by playing with the contrast and the colour itself by:
Images -> Colors -> Color Balance -> Preserve luminisity -> Red 80
Yellow -40 Magenta10
Images -> Colors -> Brightness-Contrast -> Contrast 40 -> Brightness
-20 (see Figure 8)
![[Figure 8]](../../common/images/article112/fig8_9A.jpg)
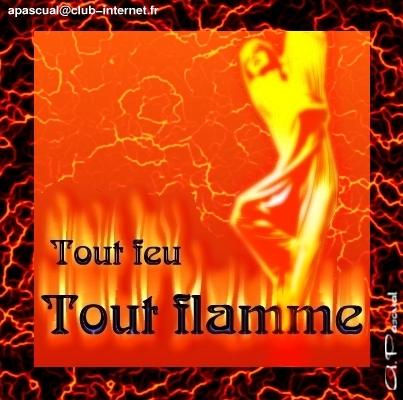
Beyond the spectacular effect and its didactic use, you may ask yourself what this procedure is good for. The image Example.jpg constitutes a response. It is an illustration from a poster for a dance course. The silhouette of the dancer is the outline, passed through the colour mill, from a photograph belonging to Sylvain Landry. With permission.
|
Webpages maintained by the LinuxFocus Editor team
© André Pascual LinuxFocus 1999 |
Translation information:
|
1999-11-07, generated by lfparser version 0.9