![[Photo Not Available]](../../common/images/Who.gif)
by Phil Ross <phil(at)ryoko.cis.pitt.edu> Content: |
![[Ilustration]](../../common/images/illustration28.gif)
Abstract:
In our regular column of the Gimp we describe some simple techniques to create and edit animations using the Gimp.
Hi, and welcome to my third Linux Focus GIMP tutorial. This time I will not be following any of Manuel's work, but doing something completely solo with GIMP. I'd like to show a little of GIMP's animation abilities. They are not too complex, but they are just good enough to be useful.
First off, let's talk about what an animation is. Animation is derived from the Latin word anima meaning life or soul. An animation, unlike a still picture, seems to have life. Since a common characteristic of many living things is motion, what better way to give life to an image than by making it move?
For those who aren't familiar, the traditional method artists have used to get their images to move is to actually create multiple images. Each image represents a different snapshot of the scene in time, known as a frame, and these frames are organized into a chronological order, earliest frame to latest frame. The animation is simply a slideshow of these frames. An animation can seem very life-like if viewed at the proper speed. The speed of an animation is better known as "frame rate" and is most often measured in frames-per-second. So let's see what GIMP has to offer in the way of animation.
 I believe in both the
first and second Linux Focus GIMP tutorials we talked about and
used the Layers functions of GIMP. We were able to do some neat
stuff with layers, and believe it or not, the Layers function
is also going to play a main part in creating our animation. In
short, each layer will act as a separate frame. The bottom-most
frame will be the first frame in the animation, and the frames
are played from bottom to top using the Animation Playback
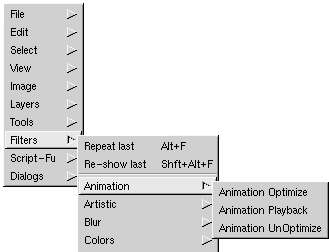
option from the filter menu. So let us go ahead and create a
little example animation.
I believe in both the
first and second Linux Focus GIMP tutorials we talked about and
used the Layers functions of GIMP. We were able to do some neat
stuff with layers, and believe it or not, the Layers function
is also going to play a main part in creating our animation. In
short, each layer will act as a separate frame. The bottom-most
frame will be the first frame in the animation, and the frames
are played from bottom to top using the Animation Playback
option from the filter menu. So let us go ahead and create a
little example animation.
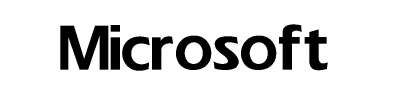
Well, this evening I happen to be in the mood for some good old-fashioned Microsoft bashing. If this offends you, I apologize...this is not meant to be childish, just cute. Anyway, I want to make a little animation about Microsoft, so the first thing I do is create the Microsoft logo in black text on a white background. The closest font I could find to Microsoft's real logo is the "Eras" font. This font is not capable of slanting, but if it were, I would be willing to bet we could get very very close to the real Microsoft font. This is close enough for our example though...it does not need to be perfect.
So now what I am going to do is make the Microsoft logo fall off the bottom of the picture. I'm going to open the Layers & Channels dialog box, and click on the Duplicate Layer button, which is the button showing two sheets of paper, one over top of the other, as its icon. This will create another copy of the layer, and I'm going to slightly modify this new layer, which is the one that will be on top. I'm going to click on the layer to make sure it is active, then choose my Rectangular Select tool from the toolbox. I am then going to go to the image window and select the last letter of the logo, which is a "t" and create a select box around it. After it is selected and you get the animated selection border (they look similar to marching ants), and when you put your mouse cursor inside the select region, it becomes a 4-directional cross. This means you can click and drag that selected region to move it. What I then want to do is move it down slightly about 5 pixels or so. I will then hit Ctrl+H to anchor the newly moved region to where it is now.
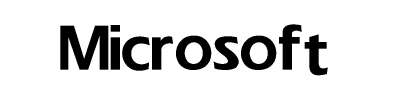
Next I want to go back to my Layers dialog box and duplicate the top-most layer to make a third layer. I will then click on the new top layer to activate it, make sure my Rectangular Selection tool is selected from the toolbox, and then go back to my image window. Next I select the last TWO letters of the logo, which are "f" and "t" and move the newly selected region down about 5 pixels or so.

It may be hard to see on this example page, but the letters are beginning slowly and smoothly drop off. So to make the logo drop completely off, I'm going to continue to duplicate each top layer, activate the new top layer, select one more letter than I did the previous time, and move them down about 5 pixels. I basically want to do this until the logo is gone.
Beware, there might be a few problems you run into. I found it easiest to make the lower layers that I was done with invisible while I worked on the top layers. This can be done by clicking on the eye icons in the Layers dialog box which turns off the eye icon for that layer. Also, when you move a region down, any area that used to be covered by that region, but is no longer covered, might become transparent. In this case you will have to choose your pencil or paint brush and paint over it.
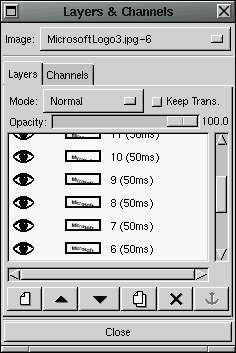 After going through this
process I had 15 frames total. I renamed the frames and put
numbers beside each frame by double clicking on the text in
each layer. And here is another hint. In the title of each
layer, you can specify a millisecond time value in parentheses
and the Animation Playback filter will show that particular
frame for that amount of time. This way you can control the
framerate of the animation on a per-frame basis. You do not
have to keep the frame-rate constant, but can change it with
each frame. For my logo example I used a 50 millisecond delay
time for each frame.
After going through this
process I had 15 frames total. I renamed the frames and put
numbers beside each frame by double clicking on the text in
each layer. And here is another hint. In the title of each
layer, you can specify a millisecond time value in parentheses
and the Animation Playback filter will show that particular
frame for that amount of time. This way you can control the
framerate of the animation on a per-frame basis. You do not
have to keep the frame-rate constant, but can change it with
each frame. For my logo example I used a 50 millisecond delay
time for each frame.
So now we have our witty little animation representing the downfall of Microsoft, and we want to save it so that we may put it on our webpage. GIMP allows us to save this animation as an animated GIF which hopefully will allow web browsers to enjoy watching it as much as we enjoyed creating it. Before saving as GIF though, we need to make sure our image is in indexed-color format instead of RGB. The title of the image window will give us this information in parentheses. If it says RGB and not indexed, you'll have to right click on the image window to get the menu, and then choose Image->Indexed. We then get a message from GIMP telling us that 255 colors or less is optimal if we are making transparent or animated GIFs. We then get an Indexed Color Conversion box which let's us choose some options for the conversion. I just go with the defaults and click OK. The title bar then shows that the image has been converted to indexed color.
Now we want to actually save the image, so let's go to the image window and right-click to get our menu. Choose File->Save As to bring up the Save Image box. Then we choose the location to save the file and type in the filename in the proper place. I called my animation DownfallOfMicrosoft.gif, and GIMP automatically determined that it was to save it in GIF format, and then I clicked OK. Now the Save As GIF box appears and let's us choose some options for the file format. You can choose to have the file saved in interlace format or not. You can choose to save a comment in the file, you can choose to have the animated GIF loop constantly, you can set the default delay between frames for the frames that you didn't specify a delay time for in the Layers dialog box, and you can choose how you the frames interact with each other during the animation. These options are purely a matter of preference, so experiment with them and see which makes your animation look best.
So here is my resulting animation below. Very simple but you can obviously do way more if you are creative enough. I could have included a powerful Linux logo that would come stomping down from above, but with my luck I would include it in this article and receive threatening calls from some Microsoft lawyers.

|
|
Webpages maintained by the LinuxFocus Editor team
© Phil Ross, FDL LinuxFocus.org |
Translation information:
|
2002-10-22, generated by lfparser version 2.32